

THE PLANNING DESIGN AND CONSTRUCTION OF A HOME IN JAPAN
Friday, January 11, 2013
Pantry
We decided to put plywood in the walls of our pantry so installing shelves would be simpler. We like the look of the bare plywood and will probably leave it unfinished.


Tile cutting
We assumed we could rent a tile saw in order to cut our tiles for the bathroom and lavatory. But there was nothing at the home centers or online. We're learning that Japanese are not very DIY. So we had to either order a saw from the states or pay a professional tile installer to cut our tiles. Since we have a LOT of tiles we are happy with our decision to cut them ourselves. Our bathroom has a lot of walls and doorways so we have to make 45 degree cuts on the ends of the tiles for the corners to fit together nicely. So far the inexpensive SKIL tile saw with its diamond blade is doing a good job. It's just very time consuming and messy.


One step back
Our builder made a mistake. He forgot to put in the extra insulation in the ceiling. We had wanted to add this product called Astro Foil during the construction to insulate the house and to prevent heat gain in the summer. Unfortunately we didn't realize until after the glass fiber insulation and half of the sheetrock was installed. Unfortunately the builder had to remove and discard all of the sheetrock in order to wrap the ceiling with the insulation. It was a hassle and he was very apologetic. We're glad that it is over and done and we can move forward again.
Here is a roll of the insulation.


Here is a roll of the insulation.

The sheetrock and insulation in the ceiling being removed.

The ceiling gets wrapped in the insulation. Looks cozier now!


Saturday, January 5, 2013
Switchplate
Here is one of those small details that turns into a long search for the perfect item...switches.
We finally found what we wanted from Jimbo.
We think it's a small detail that will make us enjoy using our switches and plugs in our house.
.JPG)
We finally found what we wanted from Jimbo.
We think it's a small detail that will make us enjoy using our switches and plugs in our house.
.JPG)
Sunday, December 30, 2012
2012 Year End
Since work has stopped until the beginning of January (2013) this is what has been done until work resumes on January 7th.


 The upstairs is more complete. Here is the skylight in the studio with the angled drywall box now installed.
 The ceiling was completed over the last few days.


All of the siding is on with the exception of the entry way area.
It will be great to see when the scaffold is removed (not sure when this will be).


The two drainpipes from the roof were installed. They're black so they blend into the siding and almost disappear.


Inside, the drywall downstairs is about 60% complete. This is looking at the kitchen with the guestroom to the left.


The first coat of mortar was spread in the bathroom and the shampoo niche was built.

It's Japanese tradition to leave a small offering of pine branches at the entrance of one's home on the New Year. So we did the same at our place.

Saturday, December 29, 2012
End of December
The siding is 90% finished. You can see just a hint of waviness which we were warned to expect from using such long thin panels. It's only visible under certain light, we like the effect so it's not a problem.

The downstairs floor is finished, the carpenter was adding a trap-door for access to the basement.

In this shot we are confirming the angle of the ceiling opening for the skylight, it will be angled on two sides to bring in more light to the studio.

The ceiling is almost finished, here they’re adding reinforcements for the ceiling fan.

Saturday, December 22, 2012
Ceiling and walls


Elsewhere the sheetrock is going up quickly.

This is the main wall in the studio which Yoko is planning to use as a background for photography.

The ceiling is also getting worked on.

Friday, December 21, 2012


Thursday, December 20, 2012
More exterior and interior work
Progress on the exterior galvanized aluminum siding continues.


On the inside...Sheetrock was going up! They were using very long sheets, which made the work go quickly and will make the later stages of taping and plastering less work.

 The ceiling above the 'sofa niche' was installed in the living room.

This is another view of the pieces of wood used to put the floating wall together. Seen from the backside.

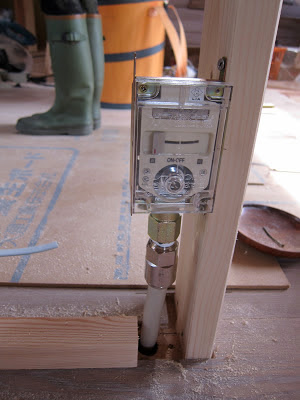
The gas company came and installed the propane lines. This outlet is near the kitchen and will be used for a propane heater. This will provide additional heat when the wood stove isn't being used.


On the inside...Sheetrock was going up! They were using very long sheets, which made the work go quickly and will make the later stages of taping and plastering less work.


This is another view of the pieces of wood used to put the floating wall together. Seen from the backside.

The gas company came and installed the propane lines. This outlet is near the kitchen and will be used for a propane heater. This will provide additional heat when the wood stove isn't being used.

Subscribe to:
Posts (Atom)