Sunday, December 30, 2012

2012 Year End

Since work has stopped until the beginning of January (2013) this is what has been done until work resumes on January 7th.

All of the siding is on with the exception of the entry way area.
It will be great to see when the scaffold is removed (not sure when this will be).

The two drainpipes from the roof were installed. They're black so they blend into the siding and almost disappear.

Inside, the drywall downstairs is about 60% complete. This is looking at the kitchen with the guestroom to the left.
The upstairs is more complete. Here is the skylight in the studio with the angled drywall box now installed.
The ceiling was completed over the last few days.

The first coat of mortar was spread in the bathroom and the shampoo niche was built.

It's Japanese tradition to leave a small offering of pine branches at the entrance of one's home on the New Year. So we did the same at our place.

Saturday, December 29, 2012

End of December

The siding is 90% finished. You can see just a hint of waviness which we were warned to expect from using such long thin panels. It's only visible under certain light, we like the effect so it's not a problem. 

The downstairs floor is finished, the carpenter was adding a trap-door for access to the basement.

In this shot we are confirming the angle of the ceiling opening for the skylight, it will be angled on two sides to bring in more light to the studio.
 

The ceiling is almost finished, here they’re adding reinforcements for the ceiling fan.

Saturday, December 22, 2012

Ceiling and walls

The bathroom is starting to get it's ceiling and walls.
It will need several coats of cement plaster before we can start tiling, but we've started planning out the tile layout and niche.

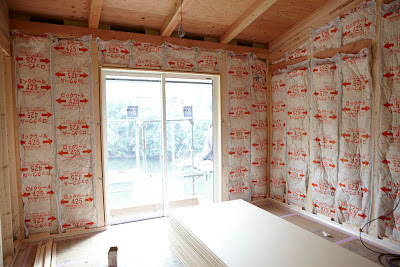
Elsewhere the sheetrock is going up quickly.

This is the main wall in the studio which Yoko is planning to use as a background for photography.

The ceiling is also getting worked on.

Thursday, December 20, 2012

More exterior and interior work

Progress on the exterior galvanized aluminum siding continues.

On the inside...Sheetrock was going up! They were using very long sheets, which made the work go quickly and will make the later stages of taping and plastering less work.
The ceiling above the 'sofa niche' was installed in the living room.

This is another view of the pieces of wood used to put the floating wall together. Seen from the backside.

The gas company came and installed the propane lines. This outlet is near the kitchen and will be used for a propane heater. This will provide additional heat when the wood stove isn't being used.


Tuesday, December 18, 2012

Siding

The exciting transformation of the exterior has finally begun!


Thursday, December 13, 2012

Floating wall detail

We specifically wanted a gallery style wall construction for our house. This floating wall is unique because it doesn't use any trim at the bottom of the wall where it meets the floor. This is to create a more minimal look as well as making it easier to repaint.

Our architect warned us that this look would make it difficult to vacuum as we would not have any trim to protect the sheetrock from bumps.

Luckily Sugimoto was very clever at coming up with a solution which would give us the look we wanted.
We've now seen the work that goes into producing this type of wall and it's very interesting and quite complicated.

First, the flooring is installed inside of the wall so there is a solid and level platform to build upon. Then, thin strips of wood are put inside of the wall and long thin strips of white painted trim are attached to this. Finally, on top of that is another strip of wood which the sheetrock will be installed above.
Sorry, it sounds complicated and it is!
Here are some pictures to help with the description...

Sugimoto and the carpenter explain to us the pieces that will comprise the construction of the lower portion of the floating wall.
These are the strips of painted wood which run around the base of the wall.
The carpenter shows us what the wall will look like once the sheetrock is in place.
Here are some detail views of how it's done prior to the final stage of the sheetrock going up.
This is a good view of the downstairs flooring with three of the four pieces in place.

Tuesday, December 11, 2012

Downstairs Flooring

Initially we were a little concerned about laying out the downstairs flooring as there seemed to be quite a lot of variation in the tones of the floor boards. But it seems like the variation actually is not distracting.
About half of the livingroom/kitchen/pantry was finished in one day.